Showing posts with label collage. Show all posts

Sunday, April 12, 2015

Trickster Collages

These kinds of collages are few and far between and by far between, I mean that these were created by 3 and 4-year olds in 2010 and we haven't done anything like this since then. The reason for this is that a parent had given me a handful of World Wildlife Fund calendars and I had enough large format African and North American animals for the children to work with. It was a kind of perfect storm -- supply could meet demand PLUS the animals included in the calendars are all featured in the trickster tales we read with the children. When you have a large class, resources become a leading factor in imagining the completion of a process.

There were sixteen of these finished pieces and I only have a handful photographed and didn't photograph the process at all. I hope the description of how these were created will help. Please let me know if you have questions...
Lion Trickster and Starry Moons
Zebra Gets Her Beauty
To begin, I folded 18"x12" sheets of construction paper in thirds. We talked about how there would be three sections of paint to represent the sky at the top, the ground at the bottom and the middle distance or horizon line at the middle. All of these are pretty consistent with the books we had been reading, especially those written by Mwenye Hadithi and illustrated by Adrienne Kennaway of which Lazy Lion (see below), Hungry Hyena, and Crafty Chameleon are favorites.


Even with the folding, I found that the horizon line was not that distinct division of sky and land that you would see with the big sky country featured in the trickster tales we were reading. I worked with the children to cut the painted papers into two strips. The children then used random pieces of landscapes cut from National Geographic magazines that the older children from the Summer Art sessions had collected and not used in their own collages to further indicate "land" in the collages. The sun/moon/star circle shapes were left over from yet another project.

We teach a glue wash and brush technique for most collages. This process creates a flat surface for collage pieces to adhere to and when a last layer is applied to the top, this seals the entire construction and gives the weight needed to balance the shrinking of the various thicknesses of the papers used.

If you look at the eagle collage below, you will see where the glue brush and glue lifted the finish off the calendar print in torn bits revealing the white paper below. Happy accidents. No big deal. Over time the children learn to calibrate their use of the brush and glue. It is a great fine motor builder and crossing of the midline exercise. Imagine moving a great puddle of glue across a sheet of paper 18-inches wide. It requires just the right effort.

Eagle Helps Take Fire From the Yellow Jacket Sisters
After the collages were dry, the children gave them titles. The titles evoked the very tales that they had been reading. In this, we are able to see the connection these tales and their collages share.

Boulder Rolls Down Hill
Big Kicker
Bear Helps Out at Night

Sunday, December 8, 2013

Fall Leaves (if at first you don't succeed, try, try again)

The 3 and 4-year olds went on a walk in the forest. I wanted them to document this experience with what I would describe as a story collage. I wanted to recreate the map that I used to outline our journey and then introduce the colors and textures of the trip itself.

I had this idea that I wanted the components of this project to be crisp and clean in color. The day was one of those beautiful, clear, Washington DC days. So I cut a bunch of white construction paper to serve as the backdrops for a sky painting and the Fall leaf collage.

We talked about the colors we saw on the trip and how the leaves were slippery to walk on. We talked about the color of the sky -- and although we are open to using any color for the sky, they all agreed, to a one, that the sky was bright, light blue. They named the colors of the leaves, yellow, orange, red, and brown. Being outside for a long period of time seemed to bring all the colors they saw into perfect clarity.

Because there was also a question of texture, I had this other idea that we would layer chunks of paper in the shades they named for the leaves. I collected strips of different scraps of paper and set these out for the children to collage onto the white construction paper.

Me and my big ideas.


The sky came out bright and blue, but the leaf collages looked absolutely tropical.


Something had to be done. The collages simply did not read, "Fall Leaves, Washington Metropolitan Area." As the collages dried, the colors came out even brighter! Pinks and lime greens, oh my!

Cue watercolor wash, golf balls, and tempera.


We set up a two-step process. Watercolor toned the brightness down and introduced the bass notes needed to set the stage for the next step, golf ball painting. Cardboard trays and tempera paint in the different shades brought the Fall covers completely back.

Once these were dried, the children assembled their maps.


Some of the maps still retained their bright colors, but I was much relieved to see something that more closely resembled what the children were describing.

Friday, January 18, 2013

Day and Night Forests, p.s. there's glitter


This week we conducted a comparative study of these books...Baba Yaga and the Wise Doll adapted by Oran Hiawyn and illustrated by Ruth Brown (love, love her illustrations and the Leaves LOVE her book, Toad), Babushka Baba Yaga by Patricia Polacco (I am, personally, not a fan of this book, but that is the adult-me talking), and we are now in the middle of Anna and The Seven Swans but Maida Silverman. We read the Wise Doll on Monday because it set up the project for the day perfectly. The children have been working on day and night paintings and last week they collaged trees onto their night backgrounds. These books show three versions of "forest" and the children are creating their own story illustrations. 
The children are adding watercolor paint on top (and beside) the tempera paint.  

We talked about how if the trees are close together or are leaning, the forest appears scarier to a small child (we will revisit this again when we work on the stories next week). Merrick's trees grow so close together that you can only see a hint of the full moon behind them. The trees are also dark in grays, black, and purple. On Monday, they will collage the trees onto their day sky. In case you are wondering why these projects are spaced just so, it is because the backgrounds are layered tempera and watercolor. When a glue wash is applied to these (especially the watercolor) the paint AND the paper used for the trees will bleed. Since each sky and trees feature different shades, the glue and the glue brushes would carry those colors with them and by the time the last children began their projects, their colors would no longer be their own.


Oh and p.s. there has to be glitter.


Friday, December 21, 2012

Sense of Place, Completed Works

The long-term building process of the children's art projects is interesting, but once completed, the titles the children give their works is the icing on the cake!

Home Airport

Ocean Airport 

 Benches

Anger of Solaria

Chinese Comedy Home

Icy 

Canada 

Bridge People 

Travel Map 

Princess Way 

Shadow Site Map

Shadow Sites 

Pit of Despair 

Dark Forest 

Park 

Water Waves

Tuesday, December 18, 2012

Fourth and Final Layers, Shadow Sites

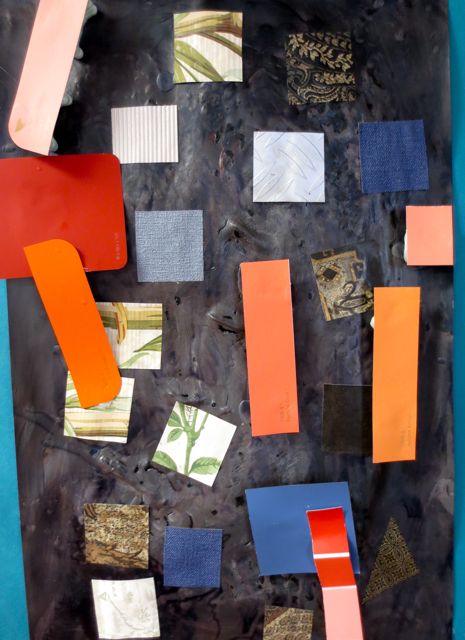
The fourth and final layers of this year's Sense of Place projects bring the Shadow Site studies to completion. The fourth layer involved a glue wash. The glue wash is a dilute glue solution brushed on with a foam brush. This glue wash does a double duty here -- it holds the square pieces of wallpaper samples and holds the layers of melted crayons, the shaving cream/paint, and the tempera. The wallpaper samples provide more "shadows" in the landscape. The children chose pieces that would represent tree and building shadows.

The final layer brought color to the deep shadows. These colors were necessary because we do not live in a desert landscape. The children tell me that these colors -- paint samples -- are buildings and in some cases, airplanes floating over the shadowscapes. 

The floating effect was created by gluing the paint samples to styrofoam peanuts and then attaching these strategically over the background.


Gluing the styrofoam peanuts to the backs of paint samples and then gluing these to the back ground.


The display goes up...


Sunday, October 28, 2012

Worm Tales

In the 3- and 4-year old class, we often work on lots and lots of collage projects. Painted paper works best as both background and layering components because it seems to have a heftier feeling and are easily managed by small fingers. Painted paper also often has two sides -- a painted side and unpainted side. This means the children have options within the context of the cut shape. We find it helpful to use collage pieces as basis for story lines, not just with materials, but also as launch points for actual stories.

The simple, yet instantly familiar, shapes of mud, water, and worms served well. The children learned more about process, technique, and the vocabulary of creating a collage And in this collage, they discovered how to illustrate a story of their own creation.

The children painted mud backgrounds, choosing paint shades that spoke for their vision of what mud should look like. Think about it...is mud brown? Not always. The water and worm pieces are painted paper scraps.